ImunifyAV is a free malware scanner for Linux servers. Similar to the ClamAV cPanel plugin, which has fewer features than its command-line interface, ImunifyAV is able to detect trojans, viruses, malware, and other malicious threats.
Additional features of ImunifyAV include automated scans, options to limit resource usage, scan history, a configurable ignore list, and much more. Imunify also offers paid versions of its software offering additional benefits, such as one-click malware removal in ImunifyAV+, and automated malware clean-up and a full firewall solution in Imunify360. To learn more about these products, visit Imunify’s official product and documentation pages.
Here we cover the steps to install the free ImunifyAV plugin on your VPS or Dedicated Server and use it to scan your server for malware, as well as some basic configuration.
Related Articles
How to SSH into VPS or Dedicated Servers
Log into Root WHM Using AMP
Install and Use ClamAV
Ways to Harden VPS Hosting
Install ImunifyAV
IMPORTANT: This solution will require root access. If this needs to be obtained, follow the guide on requesting root access.
- Access your server via SSH as the root user or using the Terminal in Root WHM
- Run the following command to download the ImunifyAV installation shell script
wget https://repo.imunify360.cloudlinux.com/defence360/imav-deploy.sh
- Run the installation script with the following command
bash imav-deploy.sh
- Run the following to ensure ImunifyAV is up to date
yum update imunify-antivirus
Run Scan in Root WHM
- Log into Root WHM
- Navigate to Plugins -> ImunifyAV
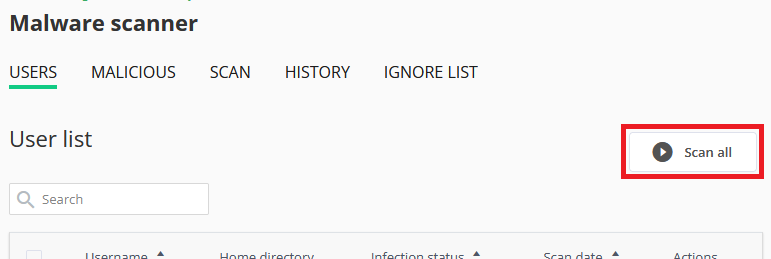
- To start a scan for all users
- On the Users tab, click the Scan all button

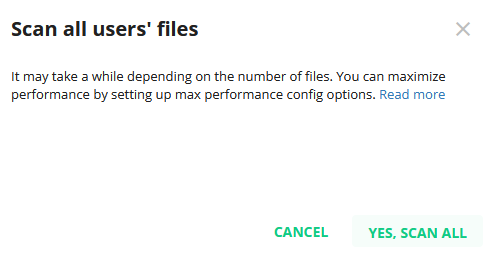
- Click the Yes, Scan All button

- On the Users tab, click the Scan all button
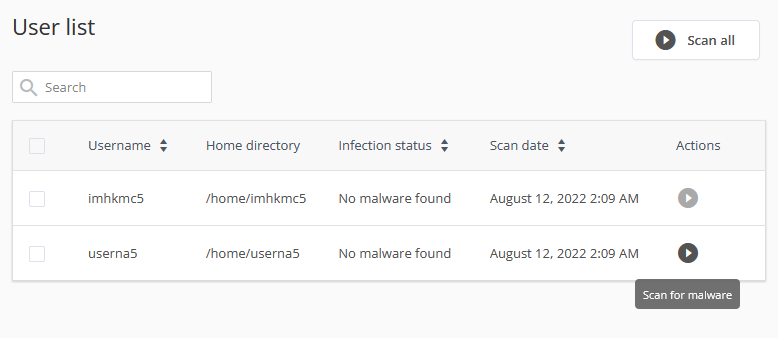
- To start a scan for a single user
- On the Users tab, click the arrow button next to the applicable user in the Actions column

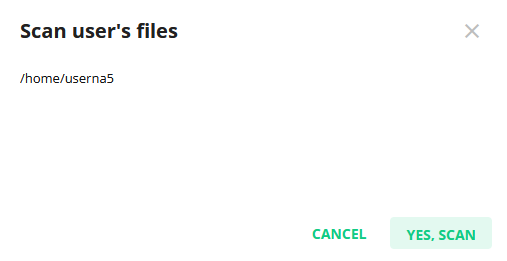
- Click the Yes, Scan button

- On the Users tab, click the arrow button next to the applicable user in the Actions column
- To start a scan for a specific folder
- Navigate to the Scan tab
- Enter the file path to be scanned in the Folder to scan field
- Click the Start button
Manage Malicious Files
- Navigate to the Malicious tab to view infected files found by Imunify
- Under the Actions column, there are a few options
- View item: View the contents of the infected file
- Cleanup item: Have Imunify remove the infection
NOTE: This feature is not available in the free version of ImunifyAV. You will need to purchase an ImunifyAV+ license from Imunify if you wish to use this functionality. Otherwise, you may choose to manually delete or edit the file using the File Manager or FTP. We recommend reviewing infected files with a security specialist or web developer to ensure malware is properly removed. - Add to ignore list: If you've determined the result to be a false positive, use this to tell Imunify the file is safe
Configure Settings
- Access the Settings page by clicking the Gear button in the top right
- Adjust limits for CPU and I/O consumption based on your server's needs
NOTE: Lower settings will mean less potential for the scan to impact the performance of your sites and applications, but slower scan speeds.
- Adjust Background Scanning configuration if desired
- Run Scanning: Leave this set to Monthly to run a scan once per month, or select Never to disable automated scans
- Day of month to run: Specify the day of the month of you'd like the scan to run (e.g. 13 means the scan will run on the 13th of each month)
- Run at: Specify the time of day to run automated scans
NOTE: This is based on the time zone set on your server. It's recommended to select a time when traffic on your site(s) is normally low to minimize the potential impact on performance.
- Click the Save Changes button
Enable ImunifyAV for cPanel Users
NOTE: By default, Imunify is only accessible from Root WHM. However, a separate user-side plugin can be installed to allow users to run scans from their cPanel account.
- Access your server via SSH as the root user or using the Terminal in Root WHM
- Run the following command as the root user to enable the ImunifyAV cPanel user interface:
/usr/share/av-userside-plugin.sh
imunify-antivirus config update '{"PERMISSIONS": {"allow_malware_scan": true}}' - To remove this plugin, run the following:
/usr/share/av-userside-plugin.sh -r
Uninstall ImunifyAV
- Access your server via SSH as the root user or using the Terminal in Root WHM
- Run the following command to stop the ImunifyAV service
systemctl stop imunify-antivirus
- If you’ve removed the imav-deploy.sh installation script, run the following command to download it again
wget https://repo.imunify360.cloudlinux.com/defence360/imav-deploy.sh
- Run the following to uninstall ImunifyAV
bash imav-deploy.sh --uninstall


Comments
0 comments
Article is closed for comments.