Backup Manager will make a comprehensive backup of your cPanel account every few days, and if needed, restoration is simple and built-in. The backups are then stored on external servers, that way, if something happens to your account or server, the data is stored somewhere unaffected by the issue!
This article covers how to schedule and restore from the backups in Backup Manager. Please note, Backup Manager backups cannot be manually deleted or removed, but as they are rolling backups there is no need to ever delete them.
Related Articles
Purchase Backup Manager/Additional Space
Cancel Backup Manager/Additional Backup Blocks
Full and Partial Backups in cPanel
Automatic Backups Using WHM
Scheduling Backups
- Log into the appropriate cPanel account
- Navigate to Backup Manager, located in the Files section
- Click the Backup Settings & Scheduling tab

- Navigate to the Backup Type that you would like to modify scheduling for

- Use the toggle to enable or disable backups under Enable or Disable Backups
- Scroll down to Schedule Backups for the Backup Type that you have chosen and adjust settings to run backups By Interval or By Day/Time

CAUTION: Once disabled, backups available that are 30 days old will eventually be deleted.
TIP: The minimum backup interval is daily and backups cannot be forced to run early.
Selecting Files to Back Up
- Log into the appropriate cPanel account
- Navigate to Backup Manager, located in the Files section
- Click the Backup Settings & Scheduling tab

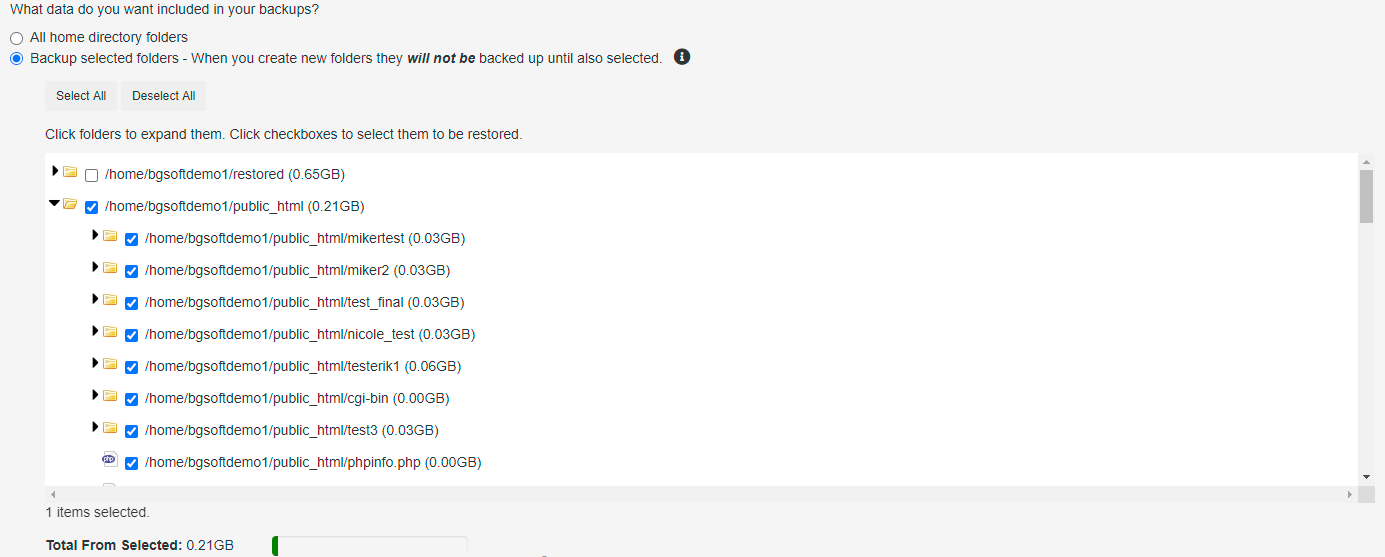
- To back up only specific folders, scroll down to Data Included in Backup
NOTE: By default, All home directory folders will be selected after enabling the automatic backups via Backup Manager - Select Backup selected folders or Exclude selected folders in order to choose specific files and folders to include or exclude
- With Backup selected folders, new folders will not be included in the Backup Manager backups until selected here
- With Exclude selected folders, new folders will be included in the Backup Manager backup until excluded here
- Select the files that you would like automatic backups to include or exclude
EXAMPLE:
Restoring from a Backup
- Log into the appropriate cPanel account
- Navigate to Backup Manager, located in the Files section
- Click the Perform a Restore tab

- Choose what you would like to restore
- Restoring Files:
- Click Home Directory under Backup Type

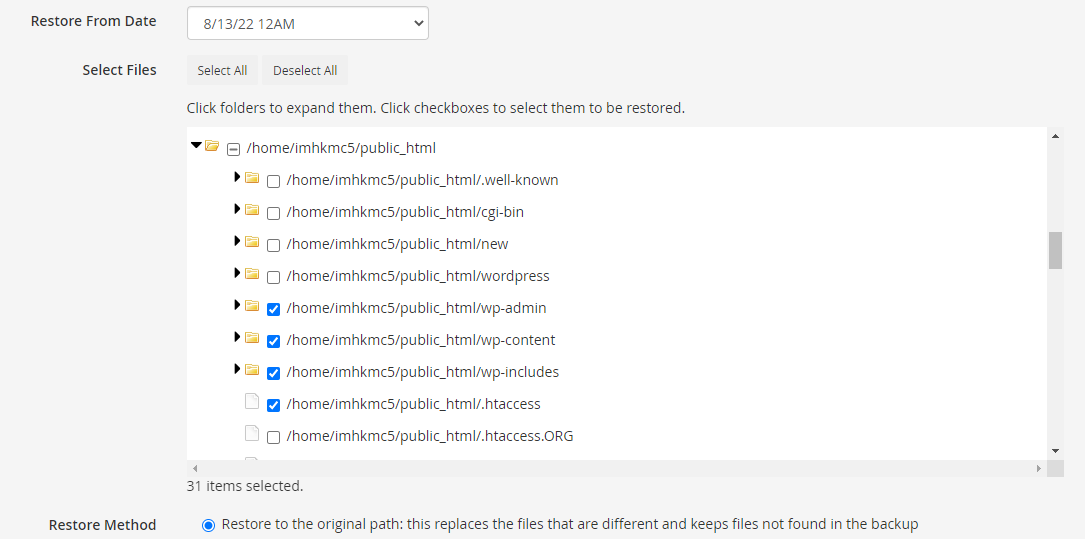
- Choose Date to restore from under Restore from Date
- Select the Files/Directory that needs to be restored
EXAMPLE:
- Choose Restore to the original path: this replaces the files that are different and keeps files not found in the backup
TIP: In some cases, restoring the backup files without overwriting the current files can be helpful, such as in debugging. In these cases, choose to Restore to a different folder instead. - Click the Restore button

TIP: Wait for the progress bar to complete and the restoration to say Finished at the top of the Restore page.
EXAMPLE:

- Click Home Directory under Backup Type
-
Restoring MySQL Database:
- Click MySQL under Backup Type

- Choose a date to restore from under Restore From Date
- Select the appropriate database under Database
EXAMPLE:
- Select Dump current database to path above and overwrite current database with the backup
TIP: A database backup can be saved without overwriting the current database by using the option Dump to the path above. - Click the Restore button

TIP: Wait for the progress bar to complete and the restoration to say Finished at the top of the Restore page.
- Click MySQL under Backup Type
- Restoring Files:


Comments
0 comments
Article is closed for comments.